Today's wargame with the Hail Caesar ruleset delivered a tense and thoroughly enjoyable skirmish set in the tumultuous Wars of the Roses. While modest in scale, the imagined 1:1 ratio of troops made every decision feel weighty and immediate.
The scenario saw a determined force of Yorkists attempting to escort vital supplies to a small, isolated manor house. Their objective was clear: ensure the provisions reached their destination, come what may. The ensuing clash was a brutal affair, culminating in a tactical draw on the tabletop. Yet, despite the stalemate in direct combat, the Yorkists ultimately achieved a strategic victory – the supplies, hard-won, would have undoubtedly reached their intended recipients.
The battle hinged on the clash of the larger wards, both of which fought with such ferocity that they effectively neutralized each other, withdrawing from the field in the same turn. This left the two smaller wards to continue the struggle, each having sustained a unit loss. It was a true test of nerve and tactical acumen, demonstrating that even with reduced forces, the fight remained fiercely contested.
This game was, as always, a fantastic experience. It served as a brilliant reminder that you don't need a massive army or an epic table-spanning battle to enjoy a deep and engaging wargame. Sometimes, the most satisfying encounters are those where every model counts, and the fate of a few supplies can feel just as crucial as the outcome of a major campaign.


Alright, gather 'round, fellow old soldiers and armchair trimmers! Today, we delve into a clash of steel and cunning, a tale ripped from the pages of the Wars of the Roses!
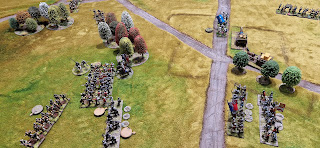
"Fauconberg's Gamble: A Desperate Dash for Warwick"
The wind whipped across the fields, carrying whispers of treachery and the clang of steel. Yorkist supply carts, laden with vital provisions for the Kingmaker, lumbered towards Warwick's waiting forces. Lord Fauconberg, a veteran of countless skirmishes, led the escort, his grizzled face set with grim determination. Little did he know, Somerset, ever the opportunist, had scented blood.
Key Events:
* Herbert's Late Arrival: William Herbert, meant to bolster Fauconberg's ranks, was frustratingly late, leaving the Yorkists dangerously exposed. His subsequent attempts to rally his men were sadly ineffectual.
* Somerset's Ambush: Somerset, backed by the ruthless Earl Rivers, launched a ferocious ambush, their numbers threatening to overwhelm the Yorkist escort.
* Fauconberg's Masterstroke: With his back against the wall, Fauconberg unleashed a whirlwind of tactical brilliance. His archers, though outnumbered, poured a deadly hail of arrows into Somerset's ranks, leaving a swathe of fallen foes.
* The Manor House Stand: The manor house became a focal point of the battle, a desperate struggle for control. Each foot of ground was contested.
* Yorkist Victory: Despite heavy losses and the exhaustion of their arrow reserves, Fauconberg's experience and the sheer grit of his men carried the day. The supply carts rolled on, their precious cargo secured.
The Aftermath:
A hard-won victory for the Yorkists! Fauconberg's tactical acumen proved decisive, though the cost was steep. Somerset's ambition was thwarted, and the supplies reached Warwick, bolstering his war effort. Tonight we celebrate the Yorkist victory, and commend Fauconberg for his tactical mastery.


No comments:
Post a Comment